Friday, June 15, 2012

Pico De Gallo: Round 2


Awhile ago, I posted a recipe for Pico De Gallo to go with the Chipotle Bowls that I made. I love pico and I've been using it in place of dressing on salads, on top of chicken and pretty much everywhere else that is socially acceptable.

The other day I had a craving for some fresh pico. I then thought to myself, "how can I add some extra protein?"

Voila! This recipe was born.

It takes a little prep work and chopping but the results are phenomenal. This is the perfect side dish to bring to a cookout or to your Thunder parties!

It's so colorful, fresh and flavorful. You may want to double it though. I can promise you that it won't last long.


Let me introduce the ingredients.

Lime juice, cilantro, tomatoes, jalapenos, salt, red onion, canned sweet corn and black beans.


First chop up 5 Roma tomatoes


Drain and rinse the canned sweet corn. Add to the tomatoes.


Chop up the onion and add.


Drain and rinse the black beans, then throw them in there.


Remove the seeds and dice up the jalapenos.


Add cilantro, salt and lime juice. There are no specific amounts for these ingredients. Just add to taste.


Stir together and refrigerate.


Pico De Gallo: Round 2

  • 5 Roma tomatoes
  • 1 small red onion (or 1/2 large)
  • 1 can sweet corn (drained and rinsed)
  • 1 can black beans (drained and rinsed)
  • 3 jalapenos
  • Cilantro, to taste
  • Lime Juice, to taste
  • Salt, to taste
  1. Combine all ingredients. 
  2. Stir together and refrigerate for at least 15 minutes.
***
I'm so beyond obsessed with this. It's so light and refreshing and tastes so great. 


Enjoy!

Kaci

Monday, June 4, 2012

Just Crazy Enough to Work

Pretty much everyone I know loves lasagna.

I love lasagna.

I would never think of messing with something so perfect. But I came across this recipe for Caprese Lasagna and I thought that it was crazy enough that it might work.

And I made it gluten-free! Win!


The best way that I can describe this dish is that it is a mix between traditional lasagna and a margherita pizza.

Crazy, right?

The answer is yes. But it's crazy delicious.

First, boil water and cook gluten-free lasagna noodles until almost al dente. Drain the noodles and coat in a little bit of olive oil.

Pick up some Jennie-O hot turkey Italian sausage. Squeeze the sausage out of the casing and brown it up.


Once it is brown, move the meat to a colander with a bowl underneath and drain. In the same pan, melt butter. Then add garlic and cook for about 30 seconds. Add Bob's Red Mill gluten-free All Purpose flour and whisk to combine.

Slowly pour in chicken broth and stir. Then add milk. Whisk until smooth and add salt and pepper.

Using a spatula, stir sauce until thick and bubble. This will take around 5 minutes. Transfer sauce to a bowl with a spout.


Spray a 9x13 pan with cooking spray. Then pour a thin layer of sauce on the bottom of the pan.


Then add 3 noodles. (Sorry about the blurry picture. My food photography skills are severely lacking.)


Then add slices of Roma tomatoes,


Torn up pieces of basil,


Some of the sausage,


Mozzarella cheese,


Then start again with sauce. Repeat 3 times.

I added a little more cheese on top just for fun.


Cover with foil and bake at 375 for 25 minutes. Remove foil and throw it back in for 15 more.

Let it sit for a few minutes before cutting it up and serving.


Caprese Lasagna

Adapted from Iowa Girl Eats 

  • 9 Gluten-free lasagna noodles (cook the whole box as some of the noodles can tear)
  • Olive Oil
  • Package of Jennie-O gluten-free hot Italian turkey sausage
  • 2 tbsp. butter
  • 2 garlic cloves, minced
  • 3 tbsp. Bob's Red Mill gluten-free All Purpose Flour
  • 1 1/2 cups chicken broth
  • 1 1/2 cups milk
  • salt & pepper
  • 4 Roma tomatoes
  • Basil
  • 1 1/2 cups mozzarella cheese
  1. Preheat oven to 375 and cook noodles according to package. Drain and coat with a little bit of olive oil and set aside. 
  2. Heat a large skillet and squeeze sausage out of casing into pan and brown. Transfer meat to colander and drain. 
  3. In the same pan, melt the better. Then add garlic and cook for 30 seconds. 
  4. Add in flour, a tablespoon at a time and stir after each addition. Cook for 30 seconds.
  5. Slowly add chicken broth while whisking to break up chunks. Pour in milk and whisk to combine. Season with salt and pepper. 
  6. Using a spatula, stir until the sauce is thick and bubbly. This will take around 5 minutes. Pour into a bowl with a spout and set aside. 
  7. Spray the bottom and sides of a 9x13 pan with cooking spray. Add enough of the sauce to the pan to cover the bottom. 
  8. Add 3 lasagna noodles, around 12 slices of tomato, a few torn up basil leaves, some sausage and 1/2 cup of mozzarella cheese. Repeat 2 times. 
  9. Cover with foil and bake for 25 minutes. When time is up, remove foil and cook for 15 more minutes.  Let the lasagna sit for 5 minutes before cutting and serving. 
***
I cut the lasagna into 12 pieces. Here is the nutritional information per slice:
Calories: 282.2
Fat: 11.7
Carb: 26.5
Protein: 16.8
Weight Watchers Points+: 7

***
Trust me, this is seriously so good. I was hoping to have some leftovers for a few days, but we ended up eating the whole thing. 


I love the fresh spin on this classic dish. It is perfect for summer because it is more light than normal lasagna.


The best part was the sauce. We couldn't get over how good the flavor was.

I've got to stop writing about this lasagna. My mouth is watering!


Enjoy!

Kaci


Wednesday, May 30, 2012

Summer Savings!

There a few ways that I know that summer is here.

1. Styling my hair becomes pointless.

2. Discounted 32 oz. fountain drinks at QuikTrip.

3. Overwhelming cravings for Passion Tea Lemonade from Starbucks.

The only problem with these glorious drinks from Starbucks is that I can only have one once a week. They are pretty expensive and I have a problem forking over $3.00 for a drink. To enjoy these suckers everyday, I'd have to forfeit my savings account and get a second job.

But I found a solution. No second job for me!


This is literally the simplest thing ever. I'm about to save your bank account.


That, my friends, is all you need. The price of the tea was almost the same as one drink at Starbucks. The whole box makes 48 servings.

48 x $3.00 = $144.00.

Or one box for roughly $3.50.

We just saved $140.50.

Let that sink in.

First, boil 1 quart of water.

While that is boiling, make 1 quart of lemonade and put it in the refrigerator.


When the water reaches a boil, turn the heat off and add a tea bag. Steep for 5 minutes.


Remove the tea bag. You can either add sugar or not. If you want it sweetened, then obviously add some sugar. I prefer to omit the sugar. Then everyone can sweeten it to their tastes or leave it plain. 

Add the tea to the lemonade. 


Put it in the refrigerator and let it completely cool before serving. 

It's so refreshing and I don't feel guilty drinking it. 

This is definitely going to be a summer staple around here.


Enjoy!

Kaci

Wednesday, May 16, 2012

Skinny Minny

Hey there!

I've got a great recipe to share with you tonight! But first, my workout for the day.

Today was my cardio day. I did a 20 minute HIIT treadmill workout and 6 minutes on the step mill with a 4 minute walk around to cool down.


Time Speed
0:00-3:00 4
3:00-5:00 6.5
5:00-5:30 8.5
5:30-6:30 6.5
6:30-7:15 8.5
7:15-8:15 6.5
8:15-9:15 8.5
9:15-10:15 6.5
10:15-11:45 8.5
11:45-12:45 6.5
12:45-13:45 8.5
13:45-14:45 6.5
14:45-15:30 8.5
15:30-16:30 6.5
16:30-17:00 8.5
17:00-20:00 4

This interval is from Sweet Tooth Sweet Life.

It was so much more difficult than it looked. I had to pause a few times and catch my breath, but I definitely got my sweat on. 

I prefer doing intervals like this because it makes the time go by much faster.

After the workout, I came home and got started on dinner.

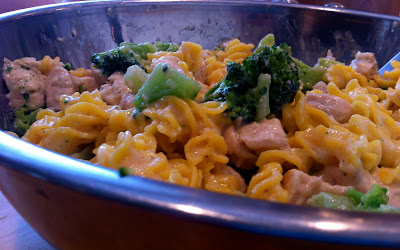
Skinny Alfredo!

Yes, the word "skinny" and "alfredo" can be used in the same sentence!

Alfredo was my absolute favorite dish when I was younger. I would order it all the time and I never branched out of my alfredo-is-the-only-italian-dish box.

My uncle always called it "heart attack on a plate." I never understood why until I read the nutritional information of a serving of alfredo.

So, between that realization and my sensitivity to gluten, alfredo hasn't been in my life for quite sometime. But that has all changed.


Don't grab the butter or the heavy cream, because you won't need it and you won't miss it!

First throw some thawed boneless, skinless chicken breasts in the skillet with some olive oil. Season the chicken breasts with some salt and pepper.


Once the chicken is brown on each side, but not done in the middle, remove and cut into pieces. Throw them back in the skillet and turn it to medium-low heat and let them finish cooking. 


While your chicken is cooking, boil the pasta. Below is the gluten-free pasta I used. 


In a large skillet, heat olive oil over medium heat. Add the garlic and cook for about 1 minute. 


Next, add flour.


Then add chicken broth, milk and Greek yogurt. Turn the heat to low and let the sauce thicken.


Once the 2-3 minutes have passed, turn the burner off and stir in grated parmesan cheese.


Add the chicken pieces to the sauce and combine.

Pour the sauce over the cooked pasta and stir.

Then add steamed broccoli and stir again.


Skinny Alfredo
Recipe from Iowa Girl Eats
*serves 8
  • 4 boneless, skinless chicken breasts
  • 4 cups steamed broccoli
  • 16 oz pasta
  • 4 tbsp olive oil
  • 4 tsp minced garlic
  • 4 tbsp Bob's Red Mill Gluten-Free All Purpose Flour
  • 2 cups chicken broth
  • 1/2 cup milk
  • 1/2 cup plain Greek yogurt
  • 1 1/2 cups grated parmesan cheese
  • salt & pepper 

1. Cook 4 chicken breasts in olive oil. Cut into pieces and place back into skillet and cook on medium-low heat.

2. Cook pasta in salted water.

3. Heat olive oil in large skillet over medium heat. Add garlic and cook, stirring constantly until golden brown. Roughly 1 minute.

4. Sprinkle in flour and whisk. Cook for 1 minute.

5. Whisk in chicken broth, then milk. Add Greek yogurt and salt and pepper. Turn heat to low and simmer 2-3 minutes until sauce thickens.

6. Turn off heat and stir in cheese. Then add the chicken. Pour over pasta and stir. Add in broccoli.

7. Serve!

***
Nutritional Information Per Serving:

Calories: 322
Fat: 14.5
Carbohydrates: 18
Fiber: 2.25
Protein: 29.75

Weight Watchers Points Plus: 8

***


This was so yummy!


It was rich but not over the top like most alfredo dishes. It was nice and light.


No heart attack on a plate here!


Enjoy,

Kaci

Tuesday, May 15, 2012

Mean, Green & Lean

Welcome to my first "new" post. Click here to learn more.

There are a lot of words to describe the recipe I'm going to share with you.

Quick. Healthy. Nutritious. Delicious. Customizable. Gluten-free.

I literally could go on and on and on and...well, you get it.


Before we get to the recipe, I'll show you what I did for my workout today.

Today was an upper body day. I'm not a big fan of working my upper body because I'm so weak, but on the other side of the coin, I want to get stronger so I push through.

In addition to the upper body, I did core and 15 minutes of cardio.

For my arms I did this Oxygen workout.
  • Dumbbell Chest Press (10 reps)
  • Dumbbell Bent Over Row (10 reps)
  • Dumbbell Shoulder Press (10 reps)
  • Dumbbell Alternate Bicep Curl (12 reps)
  • Dumbbell Tricep Extension (12 reps)
* No rest between exercises
* Rest 2 minutes between sets
* Repeat 3 times.

It was difficult, but not as intense as I thought it would be. I lifted the highest weights I could with proper form, it just wasn't very challenging. It is still a solid workout and because it only took 20 minutes, I'll file it away for when I need a quick workout.

For my abs/core, I did:
  • Stability Ball Crunch w/ 25lb. Weight Plate (12 reps)
  • Torso Rotation w/ Dumbbell (12 reps/each side)
  • Seated Crunch w/ Medicine Ball Between Knees (12 reps)
  • Decline Bench Crunch/Twist At Top w/ Medicine Ball (12 reps)
  • Plank Walks on Bosu Ball (12 reps)
This was a solid ab routine and took me about 10 minutes.

For the last 15 minutes, I hit the step mill. It is literally the most killer cardio machine ever. I am slowly building up my endurance on the thing and I'm hoping to get to 30 minutes straight.

Overall, it was a quick 45 minute workout but it was effective!

After my workout, I came home and whipped up a Green Monster.

Unfortunately, I don't have exact measurements. I just eyeball it. Sorry not sorry.

Start off with some almond milk. You can use any kind of milk here, but almond milk doesn't hurt my stomach like normal milk does.


Then I throw in 1/2 a banana


Next goes a scoop of 100% Whey Protein (vanilla)


Then I put a little under a tablespoon of peanut butter in


Toss in some ice and mix it all up


Now comes the fun part!

Spinach.


Stuff in as much of the green stuff as you can.  I know you're scared. I know you probably think I'm insane.

Trust me, I understand.

I was just like you. I've been seeing variations of this smoothie for the past 6 months and I turned up my nose every time. One day I was feeling kind of crazy and decided to give it a spin.

All I can say is, do it.

You don't taste the spinach at all. You taste peanut butter and banana goodness. I promise!


Not only is this a great source of protein, but it has a huge serving of veggies! I like to drink this immediately after a weightlifting session. It's so refreshing.


Plus, it's in a mason jar. Everything tastes better when it comes out of mason jar. It's a scientific fact.


Enjoy!

Kaci